
HOW I MADE IT: The Soft Peach Tablescape

When designing, I find no greater pleasure than curating an undeniably beautiful tablescape, that once created is ripe to be enjoyed by friends and family that very same afternoon. When creating a ‘tablescape’ we’re often working with the principle of sympathy - styling ‘like with like’ - utilising multiples of similar blooms, bouquets, vases, bowls, or candles which can be styled into a delightful rhythm across any table, no matter the size or shape. I find that often traditional table centrepieces place the biggest items towards the centre of the table - in this project, we’ll instead work with asymmetry, embracing a more modern aesthetic.
It’s important to note that we always need to balance two key elements when creating any tablescape; whilst we always want our florals to be widely admired, we also want our guests to be able to see each-other easily across the table and so this design must sit low on the tabletop - no tall vases allowed! If done well, your florals will do all the talking - think of them as the highlight to every single table, drawing together the subtle layers of texture, pattern and form across a dinner.
Tablescapes are wonderfully diverse as they can be inspired by literally any element of the decor - a fun print which could become a tablecloth, or a fabulous collection of vases, gathered over the years. I often find the very best tablescapes have some personality and include something unexpected or personal too- whether that be bowls of seasonal fruit, incense, or personalised name cards for each guest to take with them as a keepsake. There are several popular techniques we could use to create a tablescape, and in this project we’ll be creating a series of micro-bouquets, styled together to build a sumptuous, summery scene.
Ingredients
Focal Flowers: 2 stems Dahlia ‘Cafe Au Lait’
Secondary Flowers: 20 stems Rose ‘Lovely Avalanche’, 6 stems Hydrangea ‘White Mist’
Tertiary Flowers : 3 stems Lisianthus ‘Alissa White’, 25 stems Carnation ‘Apple Blossom Tea’
Sundries : 7 vases that have a sense of harmony when combined, 2 low bowls, 3 mini bud-vases, and a handful of candlesticks to style

1 - Begin by removing all leaves from the Carnation stems - carefully pluck each leaf from the stem, until all stems are clean and bare of foliage.

2 - Take a single carnation, and hold it in your recessive hand. Place a second Carnation directly to the left of the first, holding its head snugly against the first Carnation, with its stem lying atop the first. Place a third Carnation to the right of the first Carnation, ensuring its stem is positioned underneath the first Carnation. These three blooms will form the central ‘core’ of your micro-bouquet.
Add in a few more Carnations to the bouquet - any flower heads placed to the left of the centre should have their stems lying on top, and any flower heads placed to the right should find the stems lying underneath the bouquet. As you add further Carnations into the bouquet, you’ll find a smart spiral start to form in your hands.
Continue to add more stems into the bouquet, aiming for an even amount of Carnations to be placed on both the left and right of the centre core. Doing so will help your micro-bouquet to appear as evenly as possible.
Take a pair of scissors or secateurs and trim the length of your stems to around 8 inches from the Carnation flowers. You can trim them shorter a little later if you have shorter vases in which to style them.

3 - Observing the micro-bouquet from above you’ll find you have a roughly round posy of Carnations in your hand. Gently shuffle the Carnations in your hand until you have a neater, more rounded shape, pulling up, or tucking down, the Carnation heads as needed.
Once satisfied with your micro-bouquet, take a small piece of paper covered wire, and wrap this around the thinnest point of your stems - also known as the binding point. Bring the wire neatly around the binding point, and twist both ends together until the bouquet feels secure in your hands. Trim off any excess paper covered wire.

4 - Fill one of your vases with water, roughly two thirds full, and place your micro-bouquet within the vase - at this stage you can trim your stems a little more to fit the vase as needed. Repeat the same process a further six times, with one more bouquet of Carnations, two of Hydrangea, and two of ‘Lovely Avalanche’ Roses, until all your vases are filled.


5 - Start by arranging your tallest vases onto the table, followed by your widest vases. Arrange the vases onto the table in an informal style, avoiding placing the tallest or widest vases towards the centre of the table. Try to avoid placing contrasting flowers next to each other - remember you can always easily swap a vase or two later as needed.


6 - Continue to build up the tablescape by adding your hydrangea vases to the table. To provide an additional punch to these vases - a visual focal point - tuck in one or two ‘Cafe Au Lait’ Dahlia blooms, by removing all leaves from their stems, and trimming to a suitable length (approximately 6-8 inches should do the trick.) Pierce your Hydrangea bouquets with the Dahlia’s, until their stems hit the water.
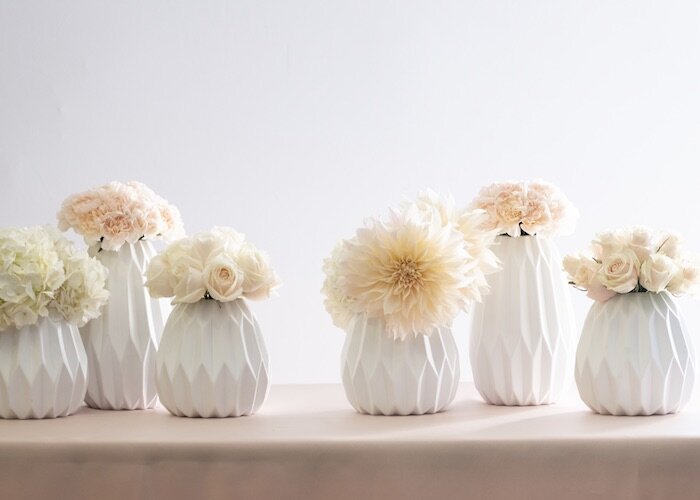

7 - Add the Hydrangea and Dahlia vases into your tablescape. Check you are happy with the positioning of the vases, and tweak or swap any you wish too.

8 - Add in a couple of low bowls filled with late Summer peaches, accessorised with crisp white plates, and a trio of small bud vases, each filled with even smaller micro-bouquets - created using Carnation and Lisianthus blooms. Adding these smaller bud vases helps bring the floral material down to the table top, connecting colour and texture at multiple levels of the tablescape.

9 - For a final touch, add in a handful of tall blush pink taper candles, placing them carefully so as to ensure they won’t catch any of the florals. Enjoy!
Top Tip -
If you’re inspired by the inclusion of fresh fruits to your tablescape, why not take advantage of the abundance of the Summer season and take the idea one step further by styling additional fruits - either on the table top for decoration, or even included on the menu … Consider using watermelons for a pop of vermillion, dark handfuls of grapes for burgundy tones, or lemons and limes for a bright, citrusy aesthetic.

Ps - if you enjoy this step by step, why not sign up to our future Resources below - you’ll be the first to hear all about our future Resources, and as a thank you, we’ve created an exclusive Resource - The Flower Care Guide - packed with my top care and conditioning information, waiting for you too!